In fact, small businesses often don’t invest in inventory management software but use Excel to manage goods in the warehouse efficiently. Because Excel inventory management is a nice choice for small business owners who are just getting started and need a place to keep track of their goods.
It serves as an ideal link between manual inventory tracking and inventory management software. Today, we'll discuss what exactly is using excel to manage inventory and how to manage inventory with Excel in this article. Wait no more, let's read it out right now.

Inventory management involves utilizing Excel spreadsheets to track and manage inventory sourcing, storage, and sale. This is implemented so that inventory managers and staff may utilize and update documentation throughout the business and supply chain. Businesses may have a better understanding of product performance and areas where the inventory management process can be improved by doing so.
Before you can utilize Excel spreadsheets, you must first become familiar with the program and learn how to organize your inventory using category columns and manual product entry. In this part, we’ll explain to you how to manage inventory in excel in-depth with two main tasks:
Now, let’s start!
- Read More: Order Management System: Definition, Process And Value
- Read More: Order management system for Ecommerce: Definition, Key Effect, Benefit
Create a new spreadsheet in Microsoft Excel to manage your inventory. Select New from the menu in Excel. To start a new Excel sheet, click the Blank workbook or press Ctrl + N. Then, navigate to the spreadsheet work area and fill in your details.
The key to making the most of Excel as an inventory management tool in determining which details to track and which categories to use to organize your data. Here are some examples of items to keep track of:
👉 Read More: How To Create Inventory Management System In Excel [Pre-made Template]
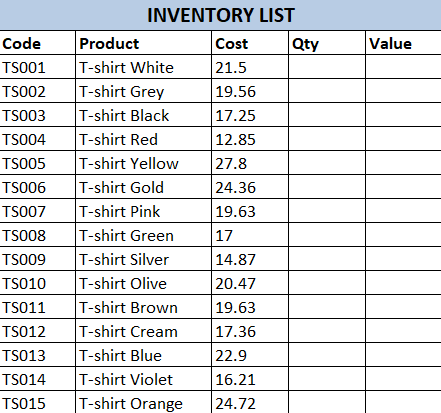
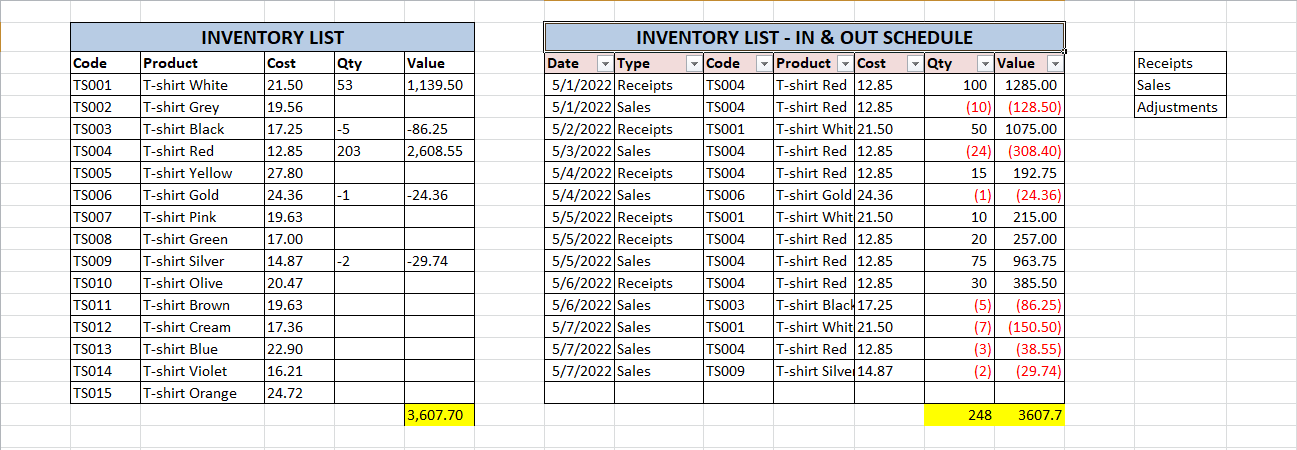
You can create an inventory listing for your items as well as a plan for inventory movement. Each product you sell may be entered into the relevant category column. It's up to you how specific you want to be, but including the product name, quantity, cost of the product, and code or SKU is undoubtedly beneficial. The following table is an example of an inventory list.
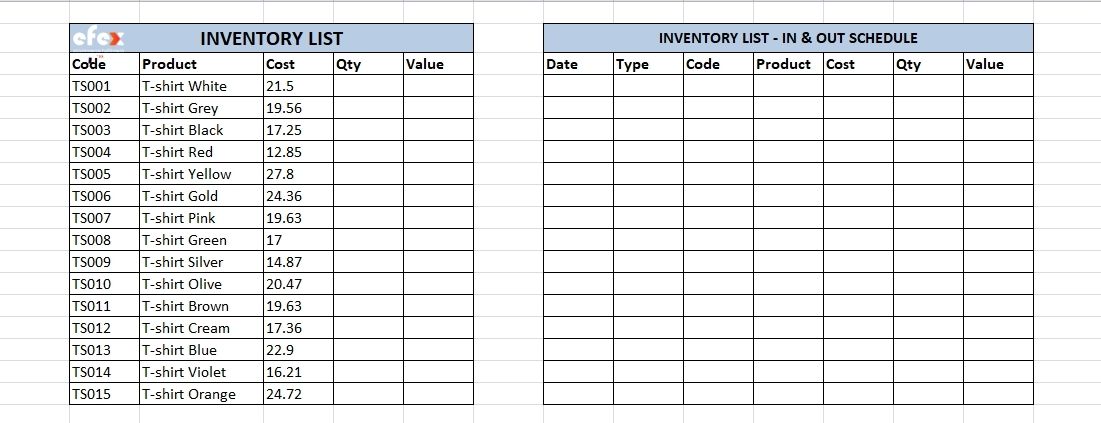
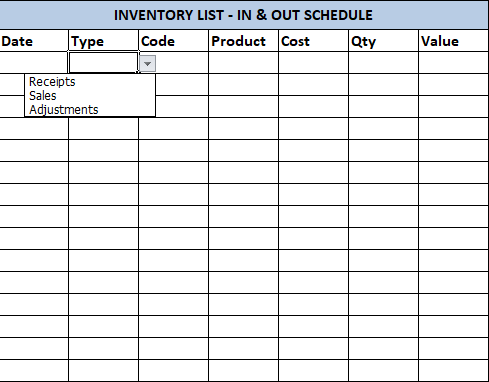
Create a new table of Inventory In & Out Schedule in the same spreadsheet with your inventory list like the image below.
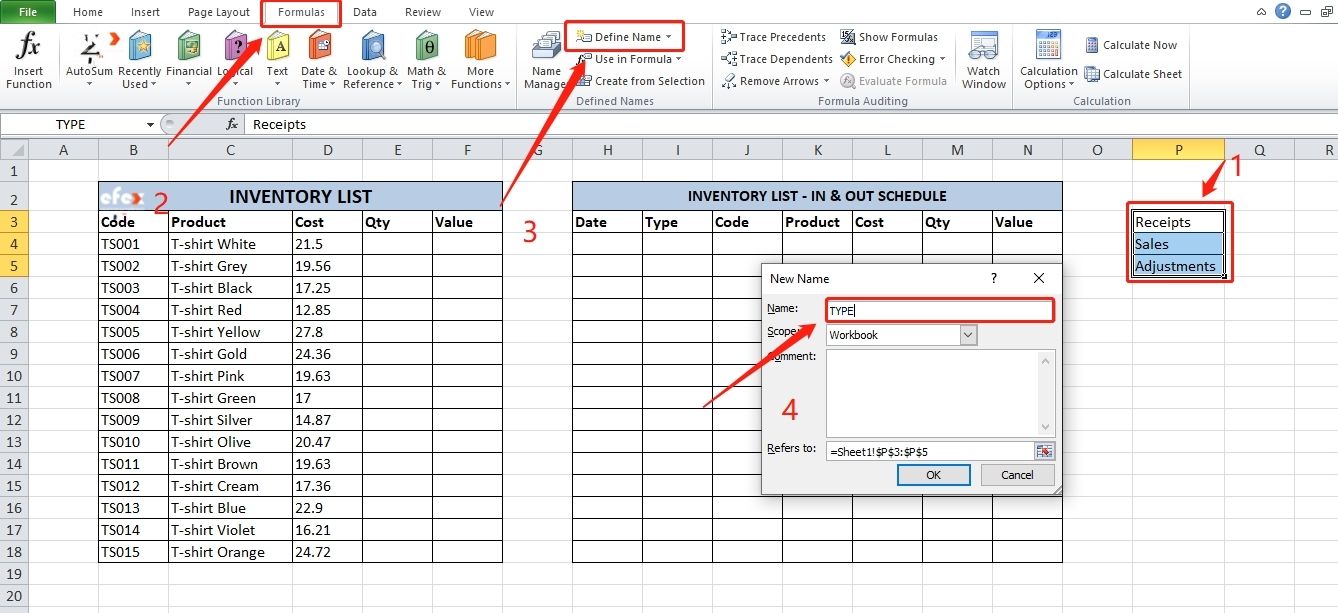
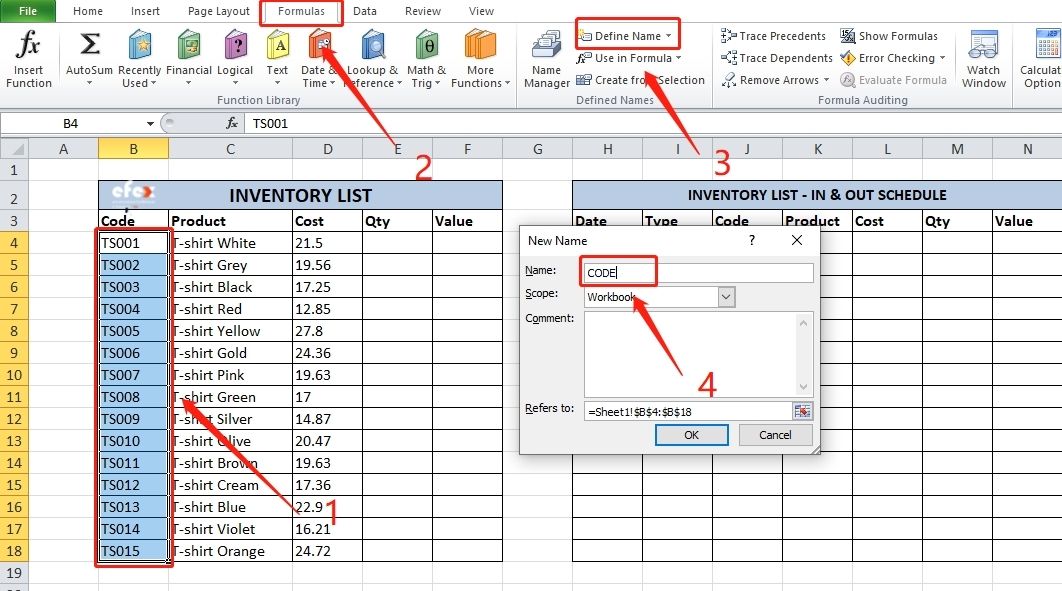
In ‘In & Out Schedule’ table, we need to define the Type of Movement we want valid entries to be either Sales Receipts or Adjustments. You need to create a new small table of these three types of movement. Then, define that table with the new name Select table > ‘Formulas’ > ‘Define Name’ > Type the name field of the table you want to define.
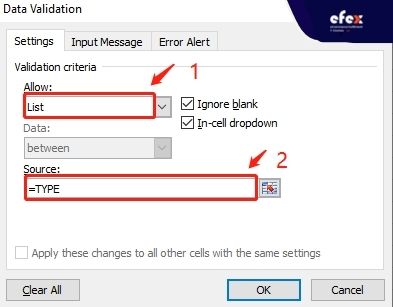
Next, we need to enter a drop-down box in cell I4. With the I4 selected, choose the data ribbon > Data validation tool.
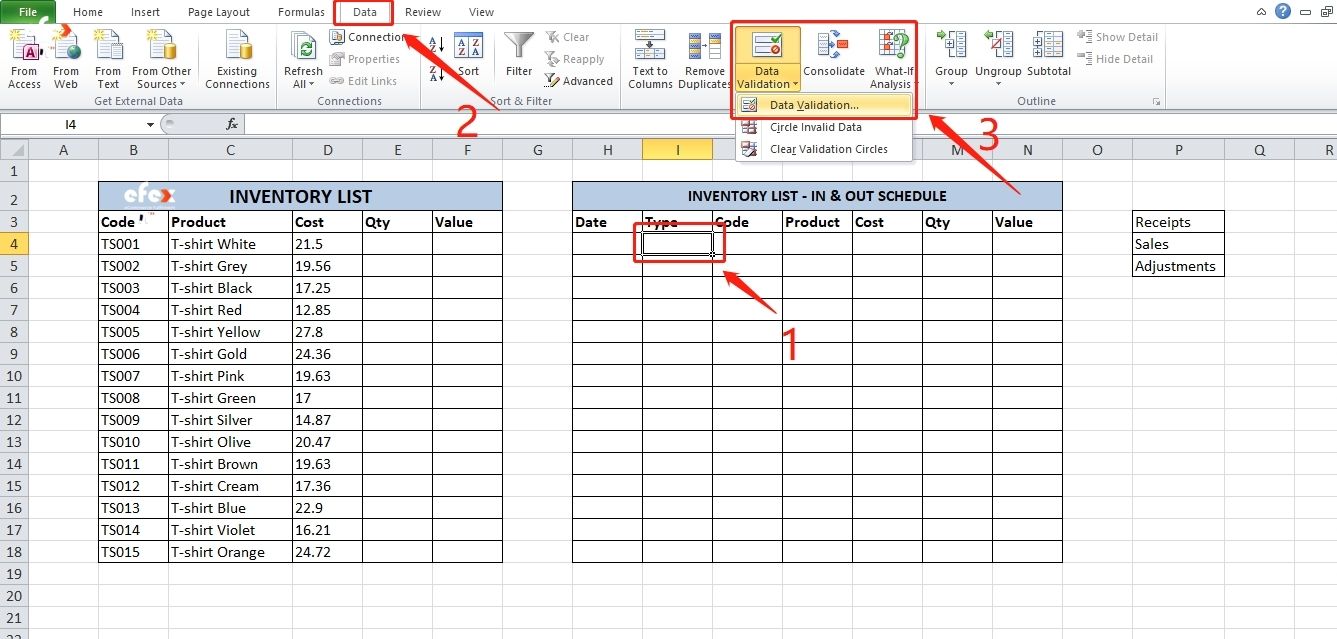
In the allow box below, select ‘List’. In the source field, enter “=TYPE” (the table name of types of movements that you’ve defined before).
👉 Read More: QR Code Inventory Management in Excel: A Complete Guide To Create
Now you can select three options from the type lists.
Drag and copy the formula on cell I4 down to the last cell in the column. So all the rows for the type column contain the type list dropdown box.
Similar to part 1 above, first you need to define the code column in the table ‘Inventory list’ with the new name ‘CODE’. Next, create a drop-down box on cell J4 and copy the formula down to the last cell.
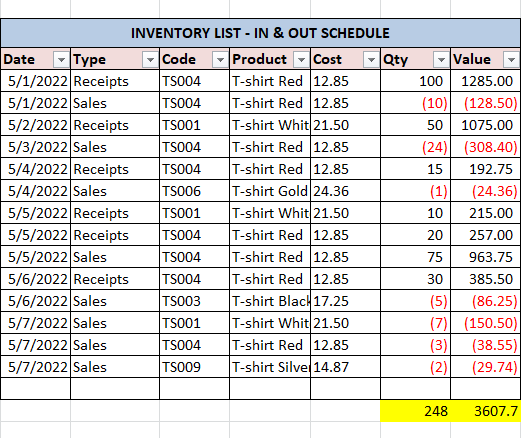
Now you can start checking your inventory with the very first phase. You need to fill in the ‘In & Out Schedule’ with Date, Type, and Code first, then Product Name, Qty, Cost, and Value.
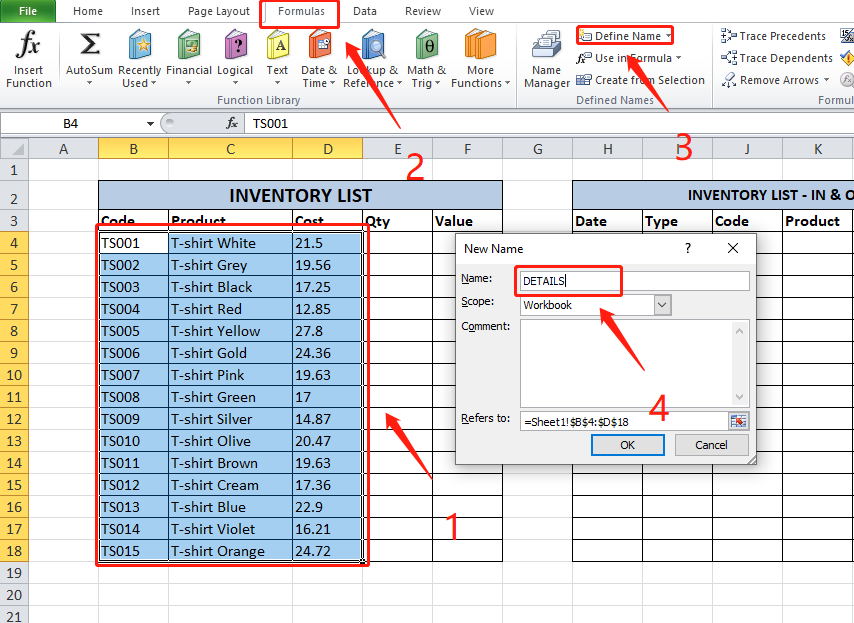
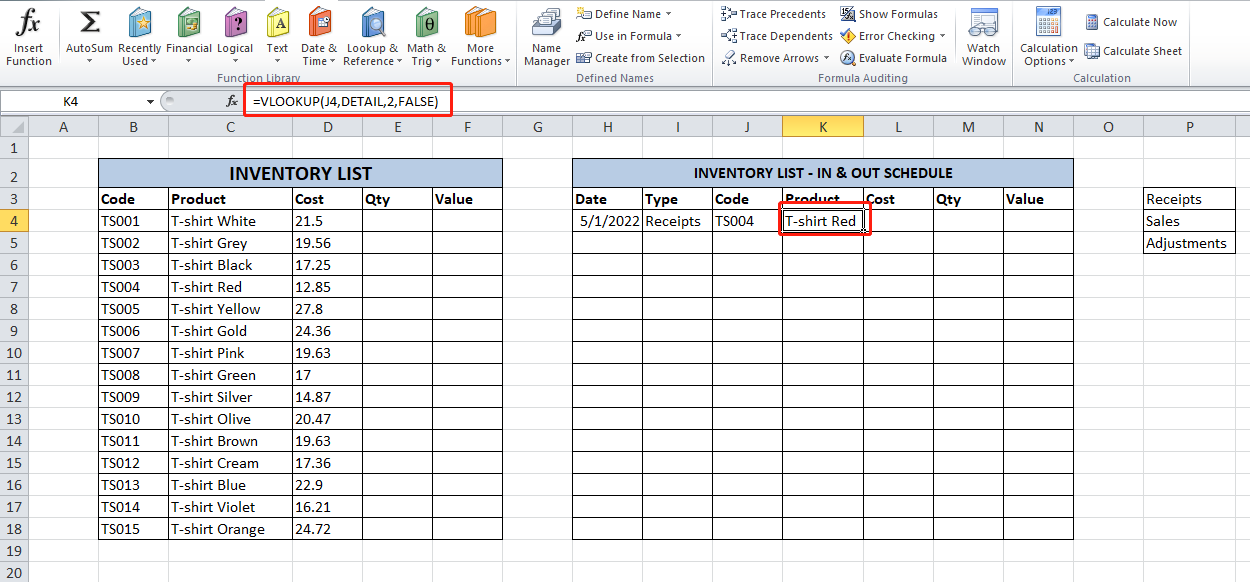
With the product name, we have the formula to double-check it following its code. First, define the ‘Inventory List’ table with the new name ‘DETAIL’, then the ‘In & Out Schedule’ table will populate with the value from the ‘DETAIL’ tables.
Use Vlookup function with the following formula to find the product name from ‘Inventory List’: =VLOOKUP(J4,DETAIL,2,FALSE)
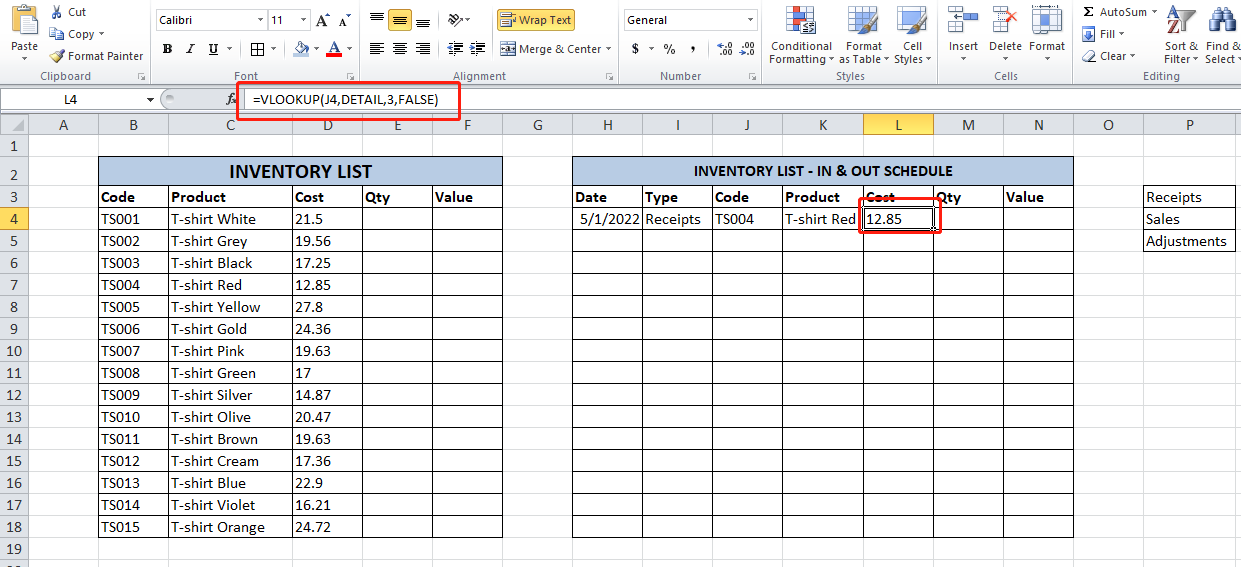
Similarly to the Cost, use the Vlookup function with the following formula to find the Cost from ‘Inventory List’: =VLOOKUP(J4,DETAIL,3,FALSE)
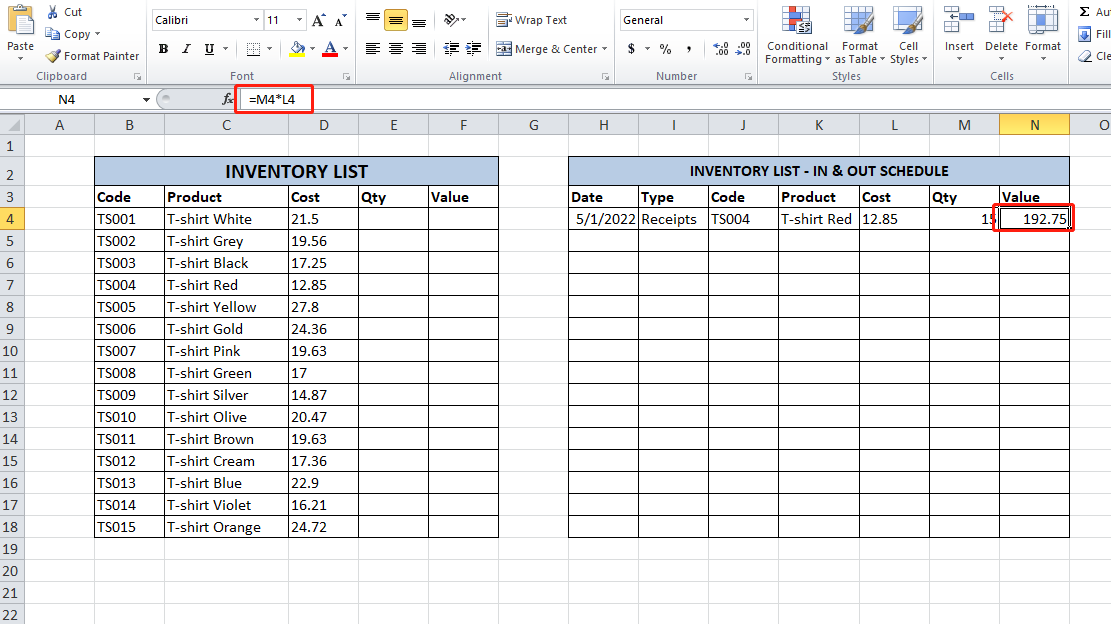
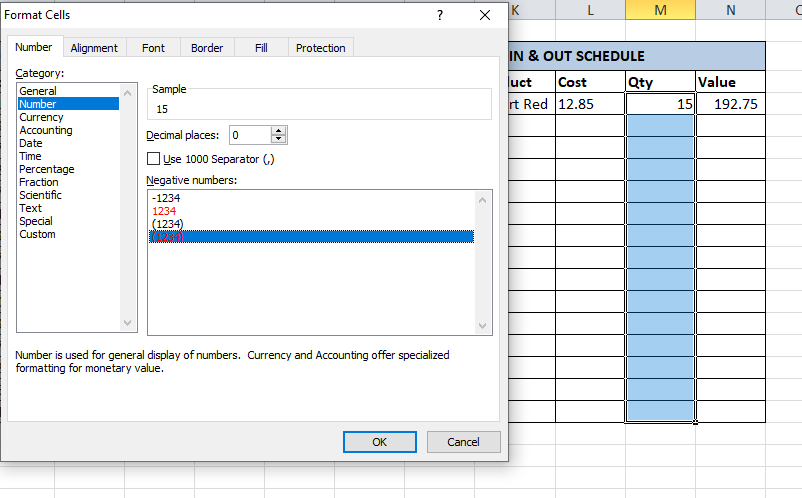
Now. let’s complete the first line with the Qty of 15 in cell M4. The value in cell N4 is simply the quantity in M4 multiplied by the cost in I4. In other words, Value = Qty*Cost
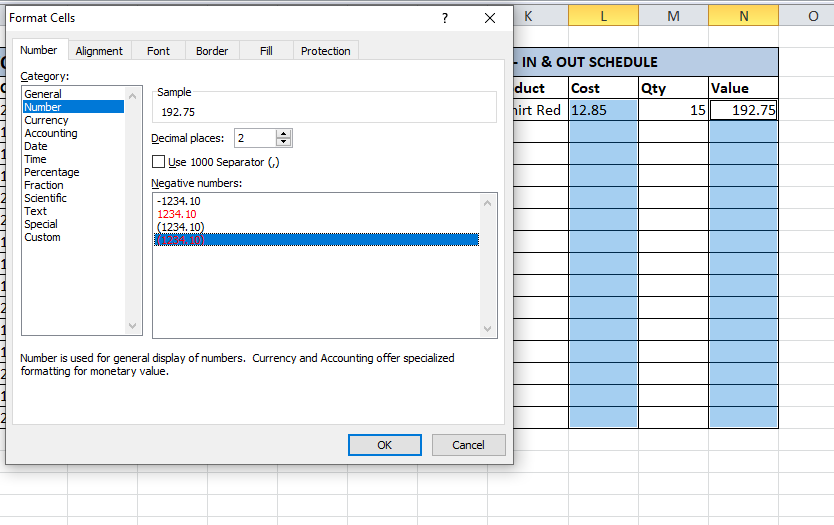
Note: In order not to receive an error message in the cells Product, Cost, Value (which totally depend on Code) when Code is invalid. You need to add some elements on Vlookup formulas on Product, and Cost cells. =IF(J4="","",VLOOKUP(J4,DETAIL,2,FALSE)) =IF(J4="","",VLOOKUP(J4,DETAIL,3,FALSE)) =IF(J4="","",+M4*L4) That’s most of the work done in the ‘Inventory In & Out Schedule’ table. Next, you need to add a couple of totals for Qty and Value and change the number formatting.
Enter these two formulas at the end of the Qty and Value column to count the total: =SUBTOTAL(9,M4:M18) =SUBTOTAL(9,N4:N18) Then, create a Filter for ‘In & Out’ table.

After step 5, you will get full of ‘In & Out’ Schedule like this:
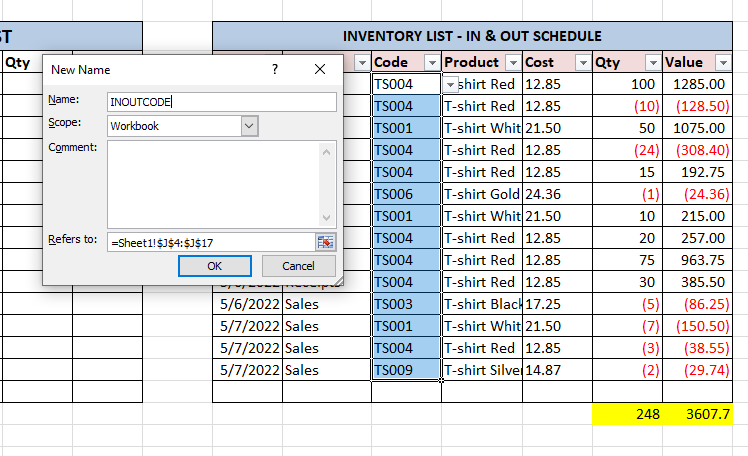
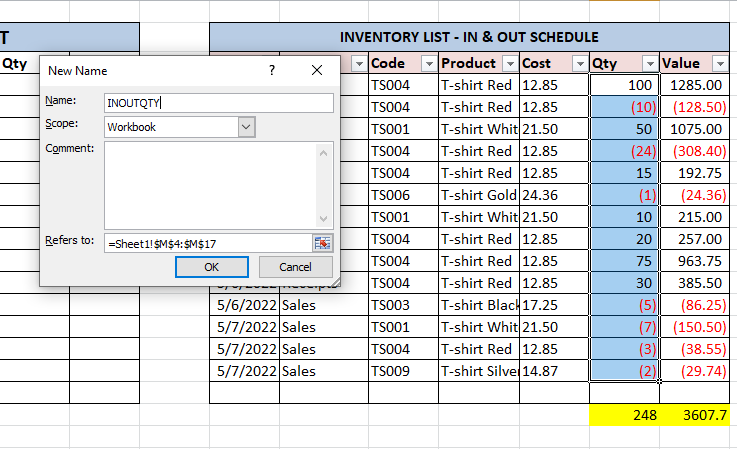
We’ve arrived at the final step! After one week of working, we’ve recorded the inventory movements like step 5. Now it’s time to summarize the running or the cumulative totals for each product. Let’s return to ‘Inventory List’ and enter the formula to automatically calculate the running or the cumulative totals for each product together with a valuation for each product line. To do this, we use the SUMIF command which will add up both the positive and negative values for each product based on the movements in the inventory. To easily use the SUMIF command, it’s better to name the range we will use: Code and Qty. We will define these two ranges as INOUTCODE and INOUTQTY.
Now, enter the formulas: =SUMIF(INOUTCODE,B4,INOUTQTY)
Define T-shirt White has the quantity of 53 which is a cumulative total. The Value = Qty*Cost
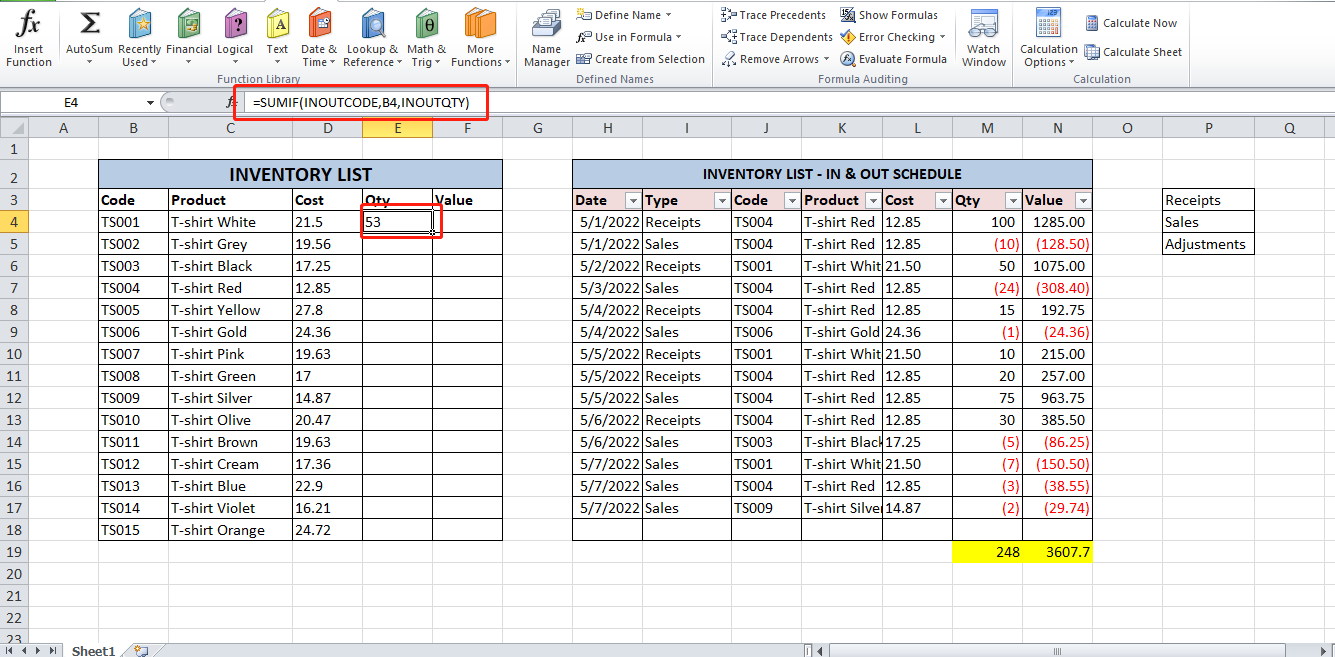
Drag Qty and Value down to the last cell and create a Sum at the end of the Value column. The final result will be like this:
Note: Remember to make sure the 0 value not be displayed. Now you’ve already known how to manage stock in Excel. However, even after you've entered all of the relevant product data, you'll still need to keep track of your spreadsheet on a regular basis. Because Excel is a static system (i.e., it lacks automation and integrations), you'll need to go to it regularly and modify your different inventory levels when sales and product movements occur. Keeping track of your inventory counts is critical, as neglecting to do so can cause delays in your supply chain and a variety of inventory problems.
👉 Read More: How Can You Disposal Of Obsolete Inventory?
👉 Read More: How To Create An SKU Number And SKU Generator
Excel may not be everyone's favorite tool, but its flexibility is difficult to deny. If you're a mid-sized company that's outgrown manual inventory monitoring but is still not ready to enter into the realm of inventory management software, Excel is a viable option. There are options here to satisfy any demand, whether you want to develop your own personalized inventory spreadsheet or download a template. It's just a matter of choosing what you want and locating the appropriate Excel file.
Excel, like every other system, isn't flawless. Following the steps to create your own template outlined in this article will help you know how to manage inventory with excel and avoid common inventory management issues.